.... on the oil cleansing method.
I was faithful for weeks, but earlier this week, frustrated with my break-outs, I got in the shower and scrubbed with my Philosophy microdelivery cleanser.
But oh, how I regret my transgression. Immediately upon exiting the shower, my face felt dry and tight. I had to race to apply moisturizer to make it feel normal again.
So I declare, right now, I will not cheat again.
My skin is broken out right now, which is frustrating. Ever since I delivered my second child (nearly TWO years ago, mind you) my skin has been misbehaving. I had flawless skin for years after taking Accutane (yes, that Accutane - the one with the lawyers telling me to sue them because it gave me Crohn's Disease or some other terrible ailment - but it didn't). I remember buying concealer to have on my wedding day, just in case, because I didn't own any. I guess all my smugness of having flawless skin and never needing more than a swipe of powder and some mascara on my face caught up with me because I currently have the skin of a teenager. Not just any teenager - teenage ME.
I used Proactiv for years after I had my first child and it helped a lot, so I used it through my second pregnancy and afterwards... but the thing is, it's kind of expensive. I have to buy it online or at the mall. Plus, I wanted something more natural, since all I've done is put chemicals on my face (and in my body, in the case of the Accutane) since I started puberty.
I heard the Oil Cleansing Method mentioned on a message board and it linked to a thread on an acne website - sounds promising, right? People claimed their skin felt amazing and they didn't have to use moisturizer (bonus!) Since I have been trying (mostly unsuccessfully) to green our lives for the past year or two, I decided to try it. I went to the organic store (shout-out to Mom's Organic Market of Columbia!) and picked up Castor oil, Jojoba oil, Grapeseed oil, and Tea Tree Oil. I had a small container from a wipes solution, so I cleaned it out and filled it with the oils (yeah, reusing - one of the 3Rs!). I kind of eyeballed it to be honest, but I was going for about 70% Castor oil, 15% Jojoba, and 15% Grapeseed, with a few drops of Tea Tree because it's supposed to help with problem skin.
I shook it up and rubbed it all over my face. It was... greasy. It felt slimy. It just seemed... wrong. I persevered, dampening a towel with hot water and laying it over my face to steam open my pores (I just typed "poors" which is an indication that I shouldn't be making blog posts this late at night). After a couple minutes I wiped the oil off and my skin felt.... normal. It wasn't tight and it wasn't greasy. I wouldn't say it was GLOWING as many people rave, but it felt clean, and smooth, and I didn't have to put any moisturizer on.
So I continued, and I was doing well until the Philosophy Incident. I don't blame Philosophy, it's not their fault they make such a nice, scrubby soap that feels so nice on your skin and kind of wakes you up in the morning. The thing is, after a few days of doing OCM, you get used to your skin feeling balanced when you're done cleaning it, and if you use any "regular" cleansers on your skin, it feels dry because it stripped all the good oils out of your face in the process of cleaning it.
Anyway, my skin has been badly broken out for about a week. I did use the clay mask (see last week's post, with photos!) and that could have brought all this new, under-the-skin type stuff to the surface. This weekend I mixed the clay mask with honey which made a lovely mask that doesn't get nearly as hard on your face - but honey is also designed to cleanse your pores, so who knows. I have been using tea tree oil on my face at night to try and clear up the acne, and I may need to adjust the oils in my OCM to better suit my face. I don't have all the answers yet, but I know that if I don't try OCM for at least 12 weeks, I can't really form an informed opinion on the subject.
So, for a few more weeks at least, I will continue putting oil on my face. No cheating, I promise. I currently do not need a moisturizer. If I wash my face at night, I just splash it with some warm water in the shower in the morning. I do use Philosophy's "The Present" clear make-up to even out my skin tone, so I guess *technically* that's a moisturizer, but I don't need it to make my skin feel balanced, so it doesn't count.... right?
I hope to update in a few weeks that my skin is flawless. Either way, I'll update and post my final decision - will I continue OCM or return to conventional products (which will likely be Proactiv)?
...stay tuned!
Wednesday, May 4, 2011
Wednesday, April 20, 2011
All-Natural Skincare - Aztec Indian Healing Clay
Wow, it's been a while since I posted - did you miss me?
Well, I'm back because I'm really excited about all-natural skincare and I had to share. About a month ago I read an article about the Oil Cleansing Method and decided to try it. This opened up a whole new world of homemade skincare products (and quite a few trips to Mom's Organic Market for oils and other fun things).
During my most recent trip I came across Aztec Indian Healing Clay. I have been reading about clay over on Crunchy Betty (an AWESOME blog for natural skincare and cleaning) and the price was right so I picked up a jar, as well as a bottle of Apple Cider Vinegar. The instructions on the clay says to mix equal parts clay + vinegar, put it on your face for 15-20 minutes. Just for fun, I snapped pictures, because what fun is a blog without pictures?

Here I am with my lovely greenish clay face. Hot, right? It gets hard pretty quickly which makes it hard to finish drinking your glass of wine, so I suggest you a) use a straw or b) chug it within the first five minutes of applying the mask.

Anyway, I flipped the TV to a new 16 & Pregnant so I ended up leaving it on a little long. It got really hard and was a little difficult to wipe off, but I soaked a washcloth with hot water, held it to my face for a few seconds, then wiped. The result? I was a little red. Like, I looked like I spent a little too much time in Ocean City without sunscreen.
 Don't worry though! The website says that's normal (phew!). My face felt really clean. To moisturize, I coated my face in a thin layer of Jojoba oil, my current favorite oil - it's really smooth on your skin, soaks in quickly, and doesn't feel really greasy. I use it in my oil for my OCM too (more on that in a later post).
I went to bed and when I woke up in the morning, no more red face! If I look tired, it's because I haven't had my coffee yet and my kids probably woke me up at 6 am. (yawn)

The verdict? Well, my skin is broken out right now, so I can't really tell you. Did it pull everything to the surface? I think it definitely did, but now I have to get it cleared up. I'm also in week 4 of OCM which is when it seems people start to break out, so who knows what's causing it. I plan to continue my natural skincare routine for at least another month or two to see if it really works. I LOVE how my face feels with OCM so if I can clear up the break-outs, I'm keeping it for good.
This clay has great reviews on Amazon (and everything on the internet is true, right?). I'm also planning to use it on my arms for my KP (keratosis pilaris) - I'm honestly willing to try anything to clear that up in time for summer!
I'll update in a week or two to let you know how things are going with my face. In the meantime, check out their website for more recipes - I think I might try the honey mask next. I've been doing a weekly honey mask so why not mix it all together?
Sunday, January 2, 2011
Happy New Year!
Happy New Year from Reluctantly Green!
I know we have been MIA recently, but I hope you all had a great holiday season. I would like to make a few resolutions for our family this year.
1) Meal Plan
Meal planning is a great way to save money and prevent waste. Typically we go to the grocery store, fill up our cart, and then come home and figure out what to make. It usually involves running back to the store to buy more ingredients, then leaving unused items in the refrigerator to go bad before we can use them. This year, we will try to sit down together once a week, plan our meals, and make a grocery list accordingly. Hopefully this will reduce our waste and our food budget.
2) Be Active
As a family, especially in the winter, we tend to all do our own thing that usually involves sitting around and watching TV or playing video games. This year, I would like us to do something active as a family at least once or twice a week. It's important for me to set a good example for my kids, and my current sedentary lifestyle is not really doing that! Personally, I plan to try to get into an exercise routine by working out 3 days a week.
I think two goals is manageable for our family. My son loves to cook, so I think letting him be involved in making dinner and planning family activities will be a great way to teach him how to live a healthy lifestyle (one that doesn't involve crash dieting and crazy work-outs to lose weight!).
Wishing you a happy, healthy new year!
Rachel
Sunday, October 3, 2010
Diaper Cover Reviews: Booroi and Weehuggers
I haven't bought fluffy mail in a long time. Ok, that's a lie - I haven't purchased a mass quantity of fluff in a while, so I was really excited when K outgrew her size small all-in-ones and I had to buy some new stuff! In the past couple weeks I've purchased 3 Tiny Tush Elite pockets, a Panda Bums AI2 tester, and the 2 covers that I'm going to review now. It's been very fluffy in our house, and will be for the next week or so as everything arrives!

Anyway, since these covers generally fly under the radar on the ol' Babycenter Cloth Diapering board, I thought I would snap some pictures and share my thoughts.
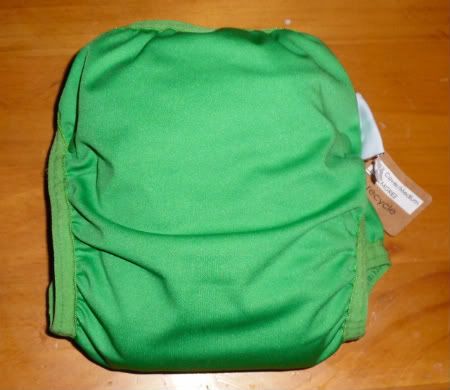
Booroi Covers
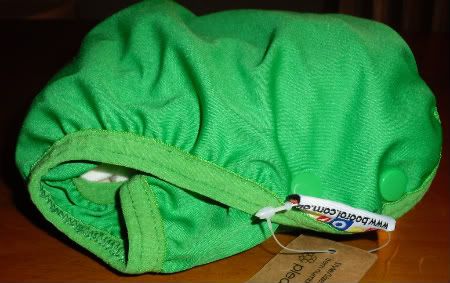
This is a sized, side-snapping cover and I purchased a medium for K, who is 16-months-old and just a little under 20 lbs. It comes in a variety of colors and a few prints. What really excited me about this is the inner elastic that goes all around the diaper and holds a prefold in place. Since I recently received my Cloth! is the New Diaper tri-fold soaker in the mail, I used that for the photos. It's made of yummy organic bamboo velour and bamboo fleece, making it super absorbent and great for nighttime. I received one with my custom fitted and thought it would be perfect by itself to lay in a cover.
Here is a picture of the insert in the cover. Obviously you can use a prefold, flat, or whatever you have lying around (even a flannel receiving blanket would work). The company also sells bamboo prefolds designed to be used with the covers. See how the neat gusset goes all the way around? It really holds the insert in place well.
The snaps are hidden on the inside so they do not touch the baby. With this bamboo insert, the cover was great overnight. You could easily use this cover throughout the day, letting it air out and replacing the insert. I do think poop is more likely to get on this cover than others, like a Thirsties or Flip. Because they are sized, you would need to continue to size up - but I think this medium will easily fit K until potty-training (she is on the tightest setting). She has pretty large thighs, but had no irritation from the inner elastic.
Here is a side shot of the diaper with the bamboo insert quad-folded inside.
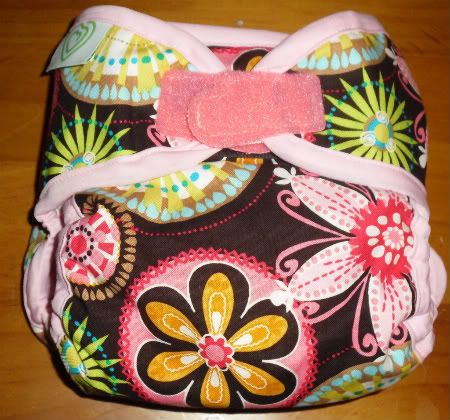
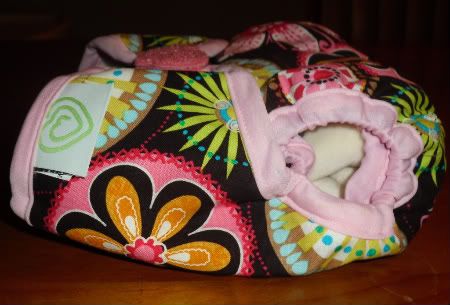
Weehuggers Covers
This is the second cover I decided to try out because it also has a lining designed to hold the insert in place. This cover is designed more like a Flip, with soft bamboo/cotton flaps to hold a prefold (or any insert) in place, although this diaper also has leg gussets, like a Thirsties cover. The Weehuggers cover comes in 2 sizes, each with a snap-down rise to accommodate a larger range of sizes. I purchased K a size 2 and snapped it down to the shortest rise setting. There is plenty of room to grow in this cover - the velcro still overlaps when I put it on.
The first think you'll notice about these covers are the adorable prints (including the very popular "groovy guitars" print) and the mitten-shaped hook and loop closure. They are also available in a snap closure (the snaps are hidden under the flaps so no snaps touch your baby).
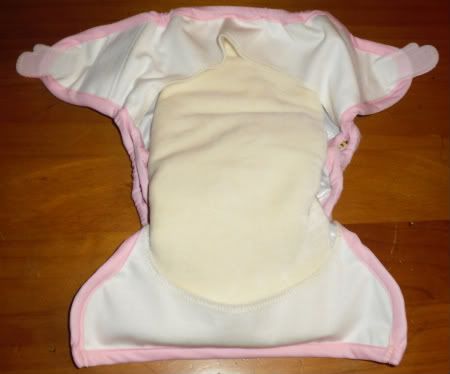
I wasn't as impressed with how this cover held the insert in place, but it still held well and made it easy to plop the insert into the diaper pail and lay a new insert inside. The leg gussets are great, and the cover also held up well overnight with the CND insert (if I use a prefold overnight, I would likely add some sort of doubler to help with absorbency). I have heard people mention that the bamboo flaps make it less "wipe and reuse" than other covers, but it usually wasn't wet when I changed the insert (except in the morning after 12 hours). Instead of PUL against baby's skin holding the insert in place, you have a soft bamboo/cotton blend. The company also sells bamboo inserts designed to fit inside the covers.
All-in-all, I really like this cover and I adore the print and pink trim. I also love that you would only have 2 sizes to purchase instead of possibly 3 with the Booroi cover. I really hope that you get the opportunity to add both of these covers to your stash!
Finally, here is a summary of the 2 covers.
-Sized
-Side-snapping
-Hidden snaps
-All-around inner elastic to hold insert in place
-Likely get dirty with a poopy diaper
-Colors and prints available
-2 sizes, each with a snap-down rise
-Front hook-and-loop closure or snaps
-Bamboo flaps to hold insert in place
-Doesn't hold insert in place quite as well
-Leg gussets
-Colors and prints available
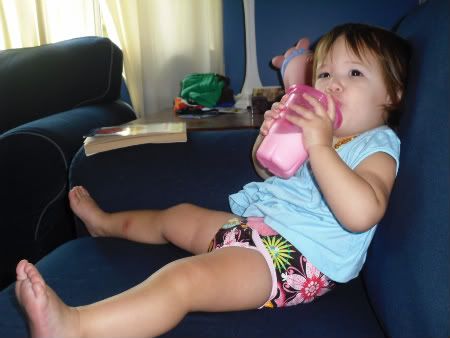
K, 16 months, wearing her Weehuggers stuffed with a prefold.
Saturday, September 18, 2010
How to Shorten Prefolds
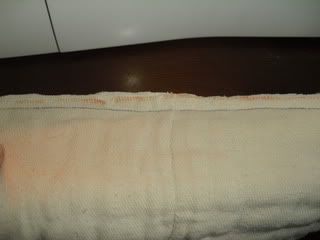
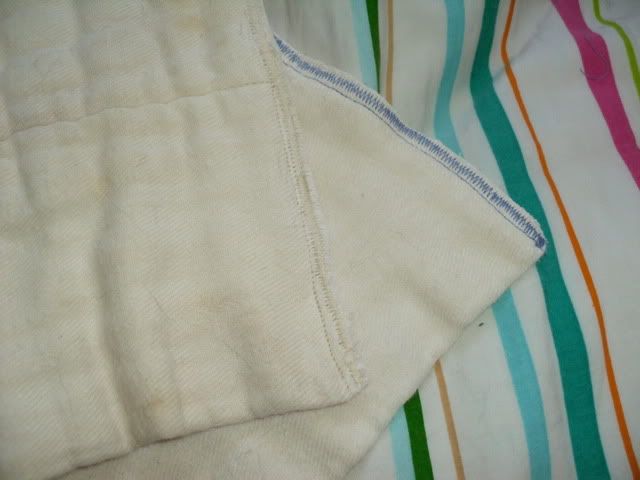
My daughter is 16-months-old with a skinny waist and short rise, but big thighs! This means she requires the width of a premium-size prefold, but the rise of an infant prefold. How to solve this problem? I trimmed the rise of my premium prefolds! This is super easy and really makes the prefold nice and trim because you don't need to fold down the rise.
I originally found instructions on Karen's Cloth Diapering Site but decided to take step-by-step pictures b/c that's what I like to follow. She sews the cut-off piece onto one edge of the prefold for a built-in doubler - great idea!
Materials
-Premium Prefold (any brand)
-Scissors or Rotary cutter
-Marking pen
-Straight edge (I used a large picture book, but if you have a ruler that would be great)
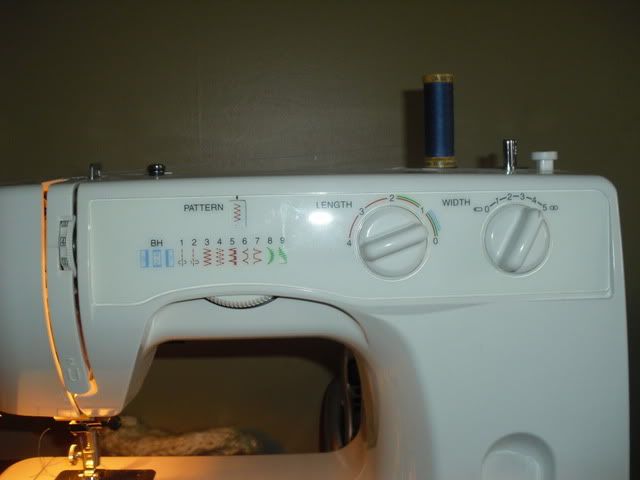
-Sewing Machine (you will be using a straight stitch and a zig-zag stitch)
Instructions
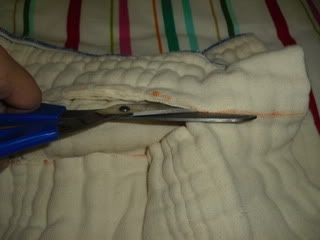
Begin with 1 premium size prefold. Measure your baby (from the top of her butt in the back to just below her belly button in the front) to determine the rise length that you need, or measure a diaper that already fits prefectly.
Use a straight edge to mark where you want to cut your prefold. Mark with a fabric pen or your child's magic marker.
Cut along your line.
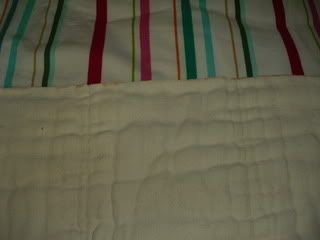
It should look like this.
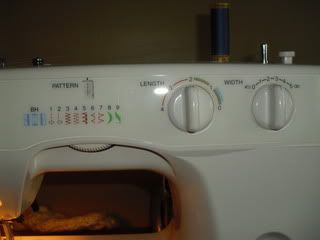
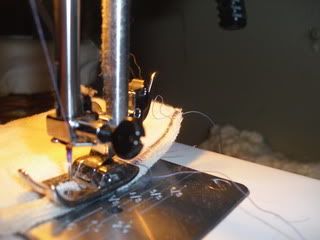
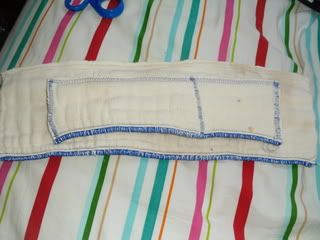
Take your prefold over to your sewing machine. You will begin by using a straight stitch. Sew about 1/4 inch from the edge of the prefold. Use whatever color thread you want, I used blue so it would show up in the pictures. On the other that I trimmed, I used white.
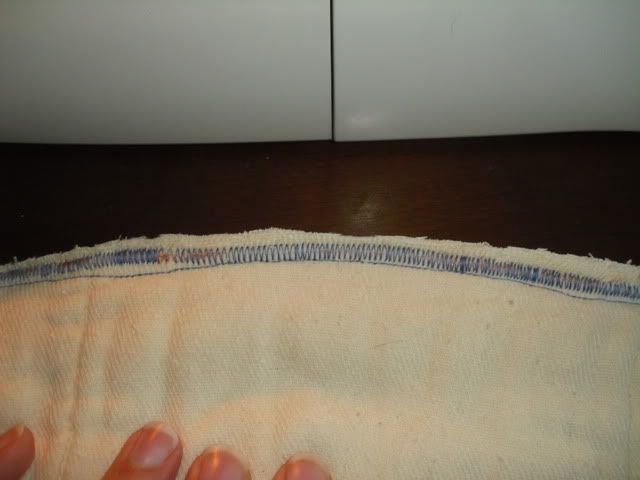
When you're finished, it will look like this:
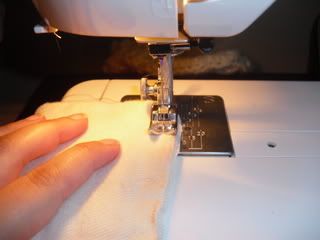
Next you're going to use a zig-zag stitch on the edge. Set your machine for a tight zig-zag (short length) that is wide enough to cover the area (long width).
You'll want your zig-zag to be along the edge of the prefold, so make sure you position it in the machine accordingly. Stitch along the edge of your prefold.
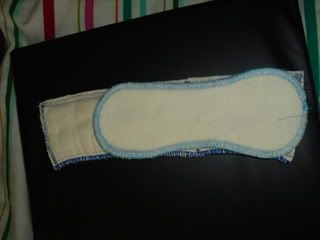
You'll end up with something like this. Hopefully your sewing skills are a bit better than mine so yours turns out straight!
If you want, trim a bit on the edge to get as close to the zig zag stitch as possible. It will look especially wonky in the thickest part of the prefold b/c you cut through so many layers. Remember, the diaper will be under a cover so it doesn't need to be perfect.
That's it, you're done! Go put the diaper on your adorable baby :)
I used the extra pieces to make doublers. One I just stitched along the edge. For the other, I cut off 1/3 of the strip and stitched it over the other thin part of the prefold, making it thick all the way across.
(last pic - comparing my tiny doubler with the GM doubler)
Saturday, August 7, 2010
Babywearing for the Clumsy
So... I'm clumsy. Like, I fall over nothing pretty easily, and people laugh. I once dropped the tube at the bank drive-through under my car. And I once nearly crashed, face-first, while wearing my baby. SO not a good example for the babywearing community!

In case there are any other clumsy mamas that want to wear their babies, here are my best tips to make it safe for both of you (and your ego).
1) Wear baby on your back.
When he/she is on your back, you can see you feet. When you can see where you're stepping, you can make sure not to miss a step or a curb and go flying into the middle of the parking lot. I also find it way more comfortable.
2) Wear sensible shoes.
I wear flip-flips 9 months out of the year, but they really aren't too safe when you're wearing your baby. If I wear sneakers, I don't have to worry about them slipping off and causing a fall.
3) Get some help while you get baby on your back.
Or, alternately, make sure she has a safe place to land if something goes wrong. I've never dropped her as I've slung my daughter over my shoulder in my mei tai, but you never know. Usually when I'm out with my husband, he will spot me and make sure she is sitting comfortably. When I'm out alone, I stand with the car door open so the seat is right below her. The same goes for taking baby off your back - make sure you hold on to your baby and she has a soft place to fall, just in case.
I use a Babyhawk mei tai wrap - it's pretty easy to learn how to use and my daughter likes it. Below is my favorite video, and this is pretty much how I always wear my daughter. Good luck, and happy (safe) babywearing!
Sunday, July 25, 2010
Update!
Sorry we have been MIA for the last 2 months! After our vacation we got insanely busy. Here are some things that we have been working on lately:
1) Our vegetable garden - we are growing corn, peas, cucumbers, and tomatoes. We picked a few peas before the plants seemed to die :( We have harvested a LOT of cucumbers, so many that we've been giving them away to friends and family b/c we cannot possible eat so many of them. Our first ear of corn is almost ready to be picked, I can't wait!
2) Recycling - Peter started recycling without even telling me, but since he does most of the kitchen cleaning it's ok. Our county recently started streamline recycling - basically, you can put everything in 1 container (we're using an large tupperware container that we used to use for 40 lb bags of dog food - see, we're even using something recycled to do our recycling) and there is no need to sort papers, glass, and plastics. Now there is really no excuse for us to not recycle.
3) Reuse! I am addicted to milk from a glass bottle, and we are able to buy it at Mom's Organic Market or Roots Market, bottled @ Trickling Springs Creamery in Chambersburg, PA. Not only does milk taste delicious from a glass bottle, it comes from local (88 miles from our house), grass-fed cows that graze happily in the sunshine. The glass bottles get returned to the creamery, sanitized, and reused - could it be any more "green"?
I hope some of you have been able to use my detergent recipe; I just made another double batch the other night (while my daughter whined b/c she thought I was grating cheese and not sharing any with her). A quick tip - this time, I just put all the ingredients in the bag, sealed it tightly, and gave it to my son to shake it up (then I did a little shaking, just to be sure). This eliminated the need to clean a bowl when I was done. Also, one more tip - don't leave your soap bits out on the counter. Peter came to me today to ask if they were pieces of cheese :)
Hope you're having a green summer - stay cool!
Subscribe to:
Posts (Atom)